
How To Make Dungeon Tiles
It happened. I have reached my final form as a middle-aged man, and I have now started crafting for RPGs.
I decided to start with basic modular dungeon tiles. They seemed like the easiest job to tackle. Dungeons, by definition, are places that are messy and falling apart. Thus, any mistakes become happy accidents giving character to your dungeon. If you have never done this before, it’s important to accept that your first round is a test. They will not be perfect. You are here to get messy, make mistakes, and learn.
Finally, as I processed these test pieces, I wanted to keep track of what I did and how that changed the final product. Videos and write-ups of this process include some instructions (like “mixing your black wash”) that are based solely on vibes. I don’t work that way, so I tried to keep notes of my construction process.
Education
Here are several different ways to make your dungeon tiles. I stole techniques from all of them as I cobbled together my process. It's helpful to watch all of them as it gets you in the mindset.
Dana Howl - The Brick video. [steps 1 and 2]
Supplies
Here are the necessary supplies. Substitutes might work but could change the outcome
Brushes. Any cheap brush will do.
Paint. I used Apple Barrel (read cheap) matt acrylic paints. Black, Pavement, Pewter Grey, Granite.
Mod Podge. Used for sealing the foam once you get it cut to size. Just get the white kind. You want matte, not glossy.
Glue. Hot glue works best for me, but tacky or Elmers will work if you are patient
XPS Foam. Purchase a large ½ inch 8’ x4’ pink sheet (if you are in the US) at a home supply store and then angrily cut it into 3 or 4 pieces in the parking lot so it will fit in your car. Save the factory edges if you can.
A box cutter and Xacto knife.
Wooden Crafting squares. I used 4-inch ones. Depending on what grid size you want, you may want something different. Not necessary, but these add a bit of heft to your tiles so they aren’t just pieces of foam swirling in the wind. Totally worth it.
Aluminum foil.
Two extra Jars (with lids) for your black Mod Podge and black wash
Ruler with a metal edge.
Optional but useful:
Cutting mats. Save the surface of whatever you are working on
Digital kitchen scale. For getting precise measurements when making your own mixtures.
Notebook paper. To take notes.
Cardboard. To act as your pallet and a place to put your drying tiles
Paper grocery bags. Something for your pieces to lie on while they dry
Part 1: Initial Construction.
Before you start, figure out how big you want the grid. If you are playing Dungeons and Dragons, 1-inch will probably work. Use 1.25 inches if you want to add walls or more space which is well beyond the scope of this write-up. Make sure to purchase your wooden crafting squares so they fit without cutting. I went with a 1-inch grid and 4-inch wooden crafting squares.
Step 1: Rough Cuts
Take your giant XPS foam and cut an approximate 10” by 10” chunk out of it with your box cutter. Glue your wooden crafting squares to the back of the smaller chunk of foam. Make sure the squares are close enough together that you aren’t wasting foam, but far enough away that you can cut around them. Maybe an inch or so apart. Keep in mind the factory edges of the XPS foam are square, this will help you draw straighter lines and measurements.
Lessons Learned: I used tacky glue for this part and it caused problems. I tried to weigh down the wooden squares with an RPG book, but, since the surface they were on wasn’t perfectly level, there was some sliding. The water from the tacky glue also caused some bending in the wooden crafting squares. I did a second round with hot glue. That worked way better, but you gotta move fast with hot glue.
Step 2: Cut out the squares
Before you start, ensure that you have something protecting your cutting surface. Cardboard helps, but a cutting mat is ideal. After the glue is dry, take your box cutter and cut out the squares from your small foam chunk. You can use the wooden crafting square as a guide, but since the foam is so thick, you are likely not going to get perfect flat sides. For the best results, stand up and square your shoulders while you cut. Also, use a sharp blade. Don’t be afraid to swap out blades from your box cutter.
Once you have your set of blocks (XPS foam + wooden crafting squares) trim the XPS foam edges so that they are as close to straight as possible. You want these blocks to be able to act as modular terrain, so marry them up, play with them, and see if generally fit together.
Step 3: Measure and draw your grid
Take your ruler and measure out a grid on your blocks. I found this to be the most nerve-wracking part, as my blocks were not quite square, so neither was my grid. However, perfect will never happen, you just want something that is close enough to fit all the other tiles. Good luck.
Mark out the grid with a ruler and ballpoint pen. Then take your trusty X-Acto knife and cut along your grid lines, about 1/8” deep. The drawn grid should help guide your knife, but go nice and slow. Then go over the grid again with a ballpoint pen. This will bevel your grid lines to make them look professional.
Step 4: Make it a dungeon
Take your ballpoint pen and draw some cracks on the floor. As well as gouging the flagstones and edges with your X-Acto knife. I think BMC’s demonstration hits home on how to do this. For cracks, I would recommend tracing your marks with your X-Acto knife and then going over them with a ballpoint pen to widen and bevel them just like with the grid lines. The deeper cracks help with the painting in the next section.
You can texture the dungeon floor by using a ball of aluminum foil and stamping the foam. Be sure to rotate the foil to avoid a repeated pattern. You could also you a sharp rock. My best results in texturing happened when I smacked it a bit harder than I felt like I needed to. I guess I like a textured dungeon.
Take the side of your pen and rub it along the outside edge of your foam blocks to bevel the sharp corners. This hides any imperfections and helps the tiles line up.
Finally, go over the grid lines again with a ballpoint pen after texturing. When the foam is smashed, it expands outward and washes out the grid.
At the end of this process, you should have something like this:
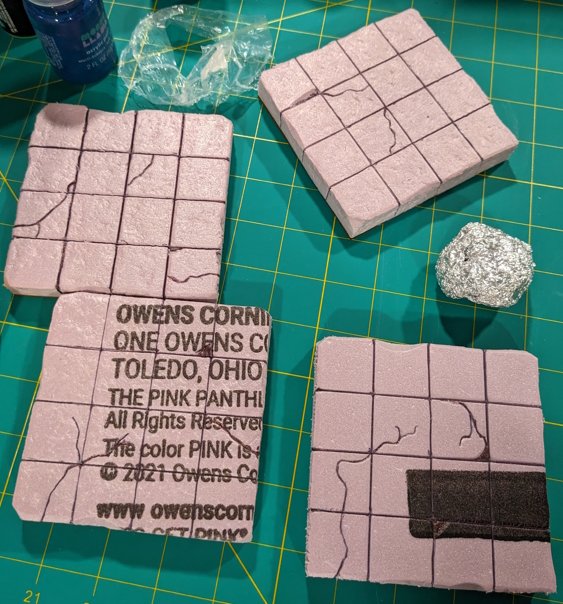
Note the bottom right tile has not yet been textured with aluminum foil
Take a moment and admire your hard work. Did you take a risk and do something different? How about a happy accident? Jot down notes so you can compare any differences later.
Part 2: Painting
In short, the point of this process is to use several layers of paint to create depth in your ruins. After the black base coat, the real trick is dry brushing and overbrushing on your beaten-up surfaces to create said depth. Finally a black wash over top ties it all together.
Step 5: Make your black mod podge
This is one of those vibe steps. Take some mod podge and put it in a second sealable container and then start slowly mixing in black paint. I probably had a ratio of 1:4 but I didn’t take any damn notes, so I don’t know. I used some cheap acrylic paints from Target to make my black mod podge. I assumed that the Mondo Llama brand acrylic paint labeled “fresh pavement” was a cute name for “black” which it might have been, but who knows?
An aside on Paints: Classy paints use their names to indicate what pigment is giving the paint its color. Paints like “titanium white” or “cadmium yellow” are colored by titanium and cadmium. For cheaper paints, like the Apple Barrel brand paints I switched to, the names are more evocative as opposed to informational.Anyway, once your black Mod-Podge is mixed. Slap a coat on your tiles. No need to do the bottom, of course, but don’t forget the edges. Keep the coat fairly light, but a couple of blobs of paint are ok. Remember: these are ruined flagstones, not the perfect marble floor of the Iron Citadel of the Seven Skys. Applying Mod Podge to the bottom of the tile seals the wooden bits in and protects them from moisture.
Wait for the Mod Podge to dry.
Step 5b. Base coat.
If your black mod podge covered your tile well enough, you can skip this step. For me, there were some translucent spots, so I decided to take the darkest Apple Barrel paint I had that wasn’t black (pavement) and did a base coat.
Wait for the base coat to dry.
Step 6: The base grey
This involves overbrushing, which is a step between using a wet brush and dry brushing. You are aiming to get paint on the top of your flagstones, but not in the cracks and gridlines. For this step, I used Apple Barrel Pewter. Put some on your pallet (use some cardboard), take your brush and dip it in the paint, then work off the excess on the pallet. Once your brush is pretty-but-not-completely-dry, lightly start brushing the top of the foam. You are not looking for complete coverage. If some of the black shows through, especially on the lower bits, you're doing great. Remember this is building a visual depth. If paint gets in the cracks and gridlines, it will be fine. They will just look a little washed out.
As you can see below, I didn’t work enough paint off my brush and my cracks look washed out.

Wait for the base grey to dry.
Step 7: Frosting the tiles
Take your lightest grey (for me it was the Apple Barrel granite) wet the brush, and then work almost all of the paint onto a paper towel or pallet. Move the brush quickly across the terrain, and you should see the highest parts of the texture pick up the grey. I pressed a bit harder than I should have, but it still created a neat pattern. Almost like a “snow on ruins” effect. Very Bob Ross's “happy accidents”. The wash will muddy out the highlights, so don’t worry if it looks to “bright”.

Wait for the frosting to dry.
Step 8. Make your black wash
Your black wash is going to tie everything together. This is an important and scary step. You are going to take your beautiful tiles and dump some black paint mixed with water all over them. I have never made a wash before, but luckily, I measured this time. The common internet wisdom of a 10-1 ratio of water to paint works.
I used my kitchen scale and here is the exact recipe.
100ml water
10 ml Apple Barrel Black
3 drops of dish soap.
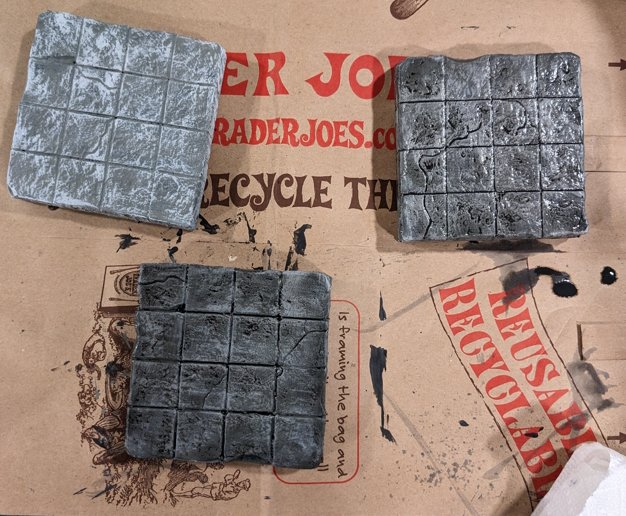
I tried this with and without dish soap. The results are almost the same, although, with the dish soap, it flows a bit better. You can go fairly heavy with the wash, as it will lighten while it dries. You can see the difference in the image below, the tile to the right and the one on the bottom have been washed (and are still wet).
Step 8b. Second Wash/Marker
This is optional, but if you have grid lines and some cracks that look washed out, you can take a tiny brush and dot some wash in those areas to darken them. Be careful to get the wash only in the cracks or you might darken the area around the crack as well. If you have a thin Sharpie, you can also just draw them in.
Step 9. Seal them in
After all the paint is dry, a light coat of matte uncolored Mod Podge over the whole tile will protect it and provide a light sheen. Mod Podge technically takes 4 weeks to “cure” but in my experience with a light coat, the tile is dry and doesn’t feel tacky after 24 hours.
The picture below shows the final product. The 2x4 tile on the top right has had Mod Podge applied as a sealer. The other two haven’t been sealed.

Step 10: Final Test.
Here are all the tiles I made They are ready for adventure.

For me, this was a blast. I spend most of my time working in an office, so it was fun and satisfying to do some crafting. Have you made dungeon tiles before? How did it go? Do you have any tips/tricks you want to share? Lemme know in the comments.